Kubernetes multi-node cluster deployment from scratch
Table of contents
Intro
The following guide shows how to deploy and configure a multi-node kubernetes cluster on-premise.
Master/Worker nodes are using Rocky Linux 9.1 as host OS.
Load balancer in front of all master nodes, is running on Photon OS 4.
All VMs are using the same network.
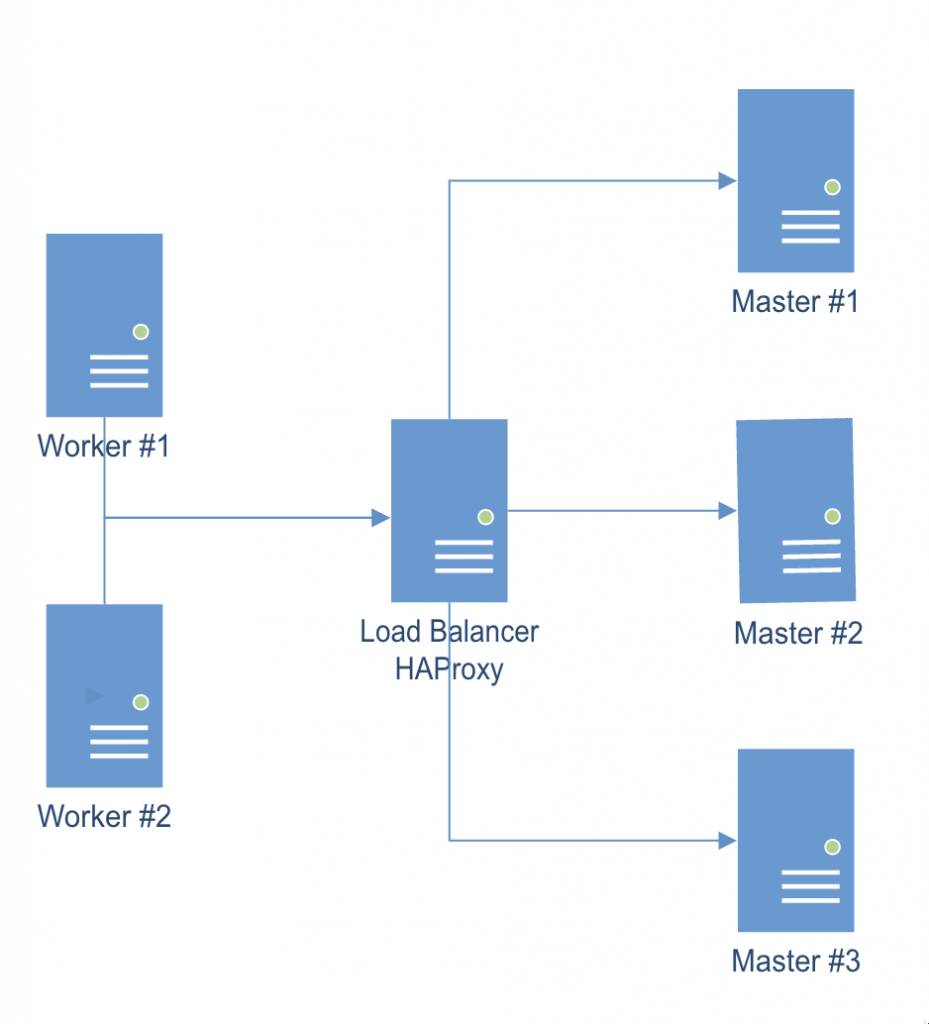
Once all cluster members have been configured as explained below, the following configuration will be effective:
Preparing all hosts (master/worker nodes)
On all hosts (master/worker):
- Setup hostname DNS resolution (either via a DNS server or by adding entries to /etc/hosts)
- Setup appropriate firewalld rules:
- On master nodes:
sudo firewall-cmd --add-port=6443/tcp --permanent
sudo firewall-cmd --add-port=2379-2380/tcp --permanent
sudo firewall-cmd --add-port=10250/tcp --permanent
sudo firewall-cmd --add-port=10259/tcp --permanent
sudo firewall-cmd --add-port=10257/tcp --permanent
sudo firewall-cmd --reload
sudo firewall-cmd --list-all
- On worker nodes:
sudo firewall-cmd --add-port=10250/tcp --permanent
sudo firewall-cmd --add-port=30000-32767/tcp --permanent
sudo firewall-cmd --reload
sudo firewall-cmd --list-all
- Configure SELinux assigning “Permissive mode”
sudo setenforce 0
sudo sed -i 's/^SELINUX=enforcing$/SELINUX=permissive/' /etc/selinux/config
sestatus
- Enable kernel modules “overlay” and “br_netfilter”
sudo modprobe overlay
sudo modprobe br_netfilter

cat <<EOF | sudo tee /etc/modules-load.d/k8s.conf
overlay
br_netfilter
EOF

cat <<EOF | sudo tee /etc/sysctl.d/k8s.conf
net.bridge.bridge-nf-call-iptables  = 1
net.bridge.bridge-nf-call-ip6tables = 1
net.ipv4.ip_forward                 = 1
EOF

sudo sysctl --system

echo 1 > /proc/sys/net/ipv4/ip_forward
- Disable swap
sudo swapoff -a
free -m
sudo sed -i '/ swap / s/^\(.*\)$/#/g' /etc/fstab
- Install container runtime: Containerd
sudo dnf install dnf-utils
sudo yum-config-manager \
    --add-repo \
    https://download.docker.com/linux/centos/docker-ce.repo

sudo dnf repolist
sudo dnf makecache

sudo dnf install containerd.io

sudo mv /etc/containerd/config.toml /etc/containerd/config.toml.orig
sudo containerd config default > /etc/containerd/config.toml
- Edit file /etc/containerd/config.toml and change value of cgroup driver “SystemdCgroup = false” to “SystemdCgroup = true”. This will enable the systemd cgroup driver for the containerd container runtime.
sudo systemctl enable --now containerd
sudo systemctl is-enabled containerd
sudo systemctl status containerd
- Install kubernetes packages
cat <<EOF | sudo tee /etc/yum.repos.d/kubernetes.repo
[kubernetes]
name=Kubernetes
baseurl=https://packages.cloud.google.com/yum/repos/kubernetes-el7-$basearch
enabled=1
gpgcheck=1
gpgkey=https://packages.cloud.google.com/yum/doc/yum-key.gpg https://packages.cloud.google.com/yum/doc/rpm-package-key.gpg
exclude=kubelet kubeadm kubectl
EOF

sudo dnf repolist
sudo dnf makecache

sudo dnf install kubelet kubeadm kubectl --disableexcludes=kubernetes
sudo systemctl enable --now kubelet
- Install CNI plugin: Flannel (check for latest version available)
mkdir -p /opt/bin/
curl -fsSLo /opt/bin/flanneld https://github.com/flannel-io/flannel/releases/download/v0.20.2/flanneld-amd64
chmod +x /opt/bin/flanneld
Preparing the Load Balancer
In this example, we are using a Photon OS 4 image, but it can be any Linux distro on top of which we can run a HAProxy instance.
- Update existing packages
tdnf update / apt-get update && apt-get upgrade / yum update
- Install HAProxy
tdnf install -y haproxy / apt-get install -y haproxy / yum install -y haproxy
- Configure HAProxy to load balance the traffic between the three Kubernetes master nodes (Replace <K8S-MASTER-NODE-1> and <K8S-MASTER-NODE-1-IP> with your node name/IP)
$ sudo vim /etc/haproxy/haproxy.cfg
global
...
default
...
frontend kubernetes
bind <HAProxy Server IP>:6443
option tcplog
mode tcp
default_backend kubernetes-master-nodes
backend kubernetes-master-nodes
mode tcp
balance roundrobin
option tcp-check
server <K8S-MASTER-NODE-1> <K8S-MASTER-NODE-1-IP>:6443 check fall 3 rise 2
server <K8S-MASTER-NODE-2> <K8S-MASTER-NODE-2-IP>:6443 check fall 3 rise 2
server <K8S-MASTER-NODE-3> <K8S-MASTER-NODE-3-IP>:6443 check fall 3 rise 2
- Restart the service
$ sudo systemctl restart haproxy
Installing client tools
Steps below relate to preparation of TLS certificate that will be used to communicate with each etcd instance.
TLS certificate can be prepared on any of the hosts, on a separate one as well, since the TLS certificate obtained will then be copied to all relevant hosts.
CFSSL (Cloud Flare SSL tool)
- Download the binaries and grant execution permission
$ wget https://pkg.cfssl.org/R1.2/cfssl_linux-amd64
$ wget https://pkg.cfssl.org/R1.2/cfssljson_linux-amd64
$ chmod +x cfssl*
- Move the binaries to /usr/local/bin and verify the installation
$ sudo mv cfssl_linux-amd64 /usr/local/bin/cfssl
$ sudo mv cfssljson_linux-amd64 /usr/local/bin/cfssljson
$ cfssl version
Generating TLS certificate
- Create a Certification Authority
$ vim ca-config.json
{
  "signing": {
    "default": {
      "expiry": "8760h"
    },
    "profiles": {
      "kubernetes": {
        "usages": ["signing", "key encipherment", "server auth", "client auth"],
        "expiry": "8760h"
      }
    }
  }
}
- Create the certificate authority signing request configuration file
$ vim ca-csr.json
{
  "CN": "Kubernetes",
  "key": {
    "algo": "rsa",
    "size": 2048
  },
  "names": [
  {
    "C": "IE",
    "L": "Cork",
    "O": "Kubernetes",
    "OU": "CA",
    "ST": "Cork Co."
  }
 ]
}
- Generate the certificate authority certificate and private key
$ cfssl gencert -initca ca-csr.json | cfssljson -bare ca
- Make sure that ca-key.pem and the ca.pem have been generated
Creating the certificate for the Etcd cluster
- Create the certificate signing request configuration file
$ vim kubernetes-csr.json
{
  "CN": "kubernetes",
  "key": {
    "algo": "rsa",
    "size": 2048
  },
  "names": [
  {
    "C": "IE",
    "L": "Cork",
    "O": "Kubernetes",
    "OU": "Kubernetes",
    "ST": "Cork Co."
  }
 ]
}
- Generate the certificate and private key (Replace <MASTER-NODE-1-IP>,<MASTER-NODE-2-IP>,<MASTER-NODE-3-IP>,<LOAD-BALANCER-IP> accordingly)
$ cfssl gencert \
-ca=ca.pem \
-ca-key=ca-key.pem \
-config=ca-config.json \
-hostname=<MASTER-NODE-1-IP>,<MASTER-NODE-2-IP>,<MASTER-NODE-3-IP>,<LOAD-BALANCER-IP>,127.0.0.1,kubernetes.default \
-profile=kubernetes kubernetes-csr.json | \
cfssljson -bare kubernetes
- Verify that the kubernetes-key.pem and the kubernetes.pem file were generated
- Copy the certificate to all nodes
$ scp ca.pem kubernetes.pem kubernetes-key.pem root@MASTER-NODE-1:~
$ scp ca.pem kubernetes.pem kubernetes-key.pem root@MASTER-NODE-2:~
$ scp ca.pem kubernetes.pem kubernetes-key.pem root@MASTER-NODE-3:~
$ scp ca.pem kubernetes.pem kubernetes-key.pem root@LOAD-BALANCER:~
$ scp ca.pem kubernetes.pem kubernetes-key.pem root@WORKER-NODE-1:~
$ scp ca.pem kubernetes.pem kubernetes-key.pem root@WORKER-NODE-2:~
Etcd installation and configuration (only Master nodes)
sudo mkdir /etc/etcd /var/lib/etcd
- Move certificates to the configuration directory
$ sudo mv ~/ca.pem ~/kubernetes.pem ~/kubernetes-key.pem /etc/etcd
- Download the etcd binaries (check latest release available), extract and move to /usr/local/bin
$ wget https://github.com/etcd-io/etcd/releases/download/v3.4.23/etcd-v3.4.23-linux-amd64.tar.gz
$ tar zxvf etcd-v3.4.23-linux-amd64.tar.gz
$ sudo mv etcd-v3.4.23-linux-amd64/etcd* /usr/local/bin/
- Create an etcd systemd unit file (replace <CURRENT-MASTER-NODE-IP> with ip address of master node you are configuring and <OTHER-MASTER-NODE-IP> with ip address(es) of the remaining 2 master nodes
$ sudo vim /etc/systemd/system/etcd.service
[Unit]
Description=etcd
Documentation=https://github.com/coreos

[Service]
ExecStart=/usr/local/bin/etcd \
  --name <CURRENT-MASTER-NODE-IP> \
  --cert-file=/etc/etcd/kubernetes.pem \
  --key-file=/etc/etcd/kubernetes-key.pem \
  --peer-cert-file=/etc/etcd/kubernetes.pem \
  --peer-key-file=/etc/etcd/kubernetes-key.pem \
  --trusted-ca-file=/etc/etcd/ca.pem \
  --peer-trusted-ca-file=/etc/etcd/ca.pem \
  --peer-client-cert-auth \
  --client-cert-auth \
  --initial-advertise-peer-urls https://<CURRENT-MASTER-NODE-IP>:2380 \
  --listen-peer-urls https://0.0.0.0:2380 \
  --listen-client-urls https://<CURRENT-MASTER-NODE-IP>:2379,http://127.0.0.1:2379 \
  --advertise-client-urls https://<CURRENT-MASTER-NODE-IP>:2379 \
  --initial-cluster-token etcd-cluster-0 \
  --initial-cluster <CURRENT-MASTER-NODE-IP>=https://<CURRENT-MASTER-NODE-IP>:2380,<OTHER-MASTER-NODE-IP>=https://<OTHER-MASTER-NODE-IP>:2380,<OTHER-MASTER-NODE-IP>=https://<OTHER-MASTER-NODE-IP>:2380 \
  --initial-cluster-state new \
  --data-dir=/var/lib/etcd
Restart=on-failure
RestartSec=5

[Install]
WantedBy=multi-user.target
- Reload daemon configuration files and enable service to be started at boot
$ sudo systemctl daemon-reload
$ sudo systemctl enable etcd
- Repeat steps above on all master nodes and then:
- Start the service on all master nodes
$ sudo systemctl start etcd
- Wait a few seconds and check that the cluster is up and synchronised (run the command on all master nodes)
$ ETCDCTL_API=3 etcdctl member list
Master nodes initialisation
Master node #1
- Create a configuration file for kubeadm (replace values of <MASTER-NODE-1/2/3-IP> and <LOAD-BALANCER-IP> accordingly
$ vim config.yaml
apiVersion: kubeadm.k8s.io/v1beta3
kind: ClusterConfiguration
etcd:
  external:
    endpoints:
    - https://<MASTER-NODE-1-IP>:2379
    - https://<MASTER-NODE-2-IP>:2379
    - https://<MASTER-NODE-3-IP>:2379
    caFile: /etc/etcd/ca.pem
    certFile: /etc/etcd/cc-ha.pem
    keyFile: /etc/etcd/cc-ha-key.pem
networking:
  podSubnet: "10.244.0.0/24"
controlPlaneEndpoint: "<LOAD-BALANCER-IP>:6443"
apiServer:
  extraArgs:
    apiserver-count: "3"
  certSANs:
    - "<LOAD-BALANCER-IP>"
  timeoutForControlPlane: 4m0s
- Initialize the machine as a master node
$ sudo kubeadm init --config=config.yaml
mkdir -p $HOME/.kube
sudo cp -i /etc/kubernetes/admin.conf $HOME/.kube/config
sudo chown $(id -u):$(id -g) $HOME/.kube/config
- Install CNI plugin
kubectl apply -f https://raw.githubusercontent.com/flannel-io/flannel/master/Documentation/kube-flannel.yml
- Copy the certificate to the two other master nodes
$ sudo scp -r /etc/kubernetes/pki root@<MASTER-NODE-2-IP>:~
$ sudo scp -r /etc/kubernetes/pki root@<MASTER-NODE-3-IP>:~
Master node #2
- Remove the apiserver.crt and apiserver.key
$ rm ~/pki/apiserver.*
- Move the certificates to the /etc/kubernetes directory
$ sudo mv ~/pki /etc/kubernetes/
- Create a configuration file for kubeadm (same content as file above used on master node #1)
- Initialize the machine as a master node
$ sudo kubeadm init --config=config.yaml
mkdir -p $HOME/.kube
sudo cp -i /etc/kubernetes/admin.conf $HOME/.kube/config
sudo chown $(id -u):$(id -g) $HOME/.kube/config
Master node #3
Same identical steps as master node #2.
Copy the kubeadm join command created when adding master nodes: It will be required to join worker nodes.
Worker nodes initialisation
Run the “kubeadm join” command copied from step above.
Checking nodes status
From a master node:
$ kubectl get nodes
Check nodes status (Ready/NotReady).
Possible issues
Node NotReady – Pod CIDR not available
Solution: Patch node with the following command (replace NODE-NAME and CIDR value accordingly).
kubectl patch node <NODE-NAME> -p '{"spec":{"podCIDR":"10.244.0.0/24"}}'
Assigning role to worker nodes
kubectl label node <NODE-NAME> node-role.kubernetes.io/worker=worker