Linux Logical Volume Management
Table of Contents
Creating a logical volume and volume group
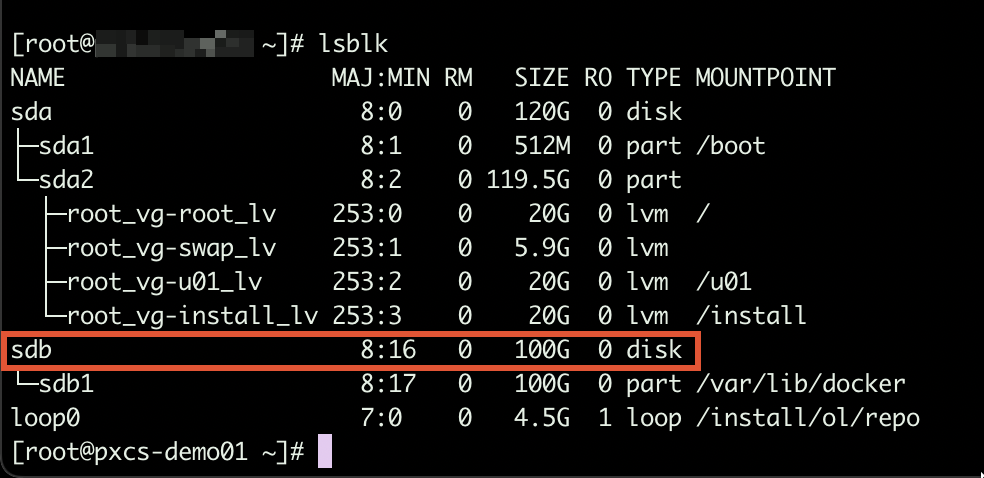
- Make sure the physical disk is listed as block device
- Create a new primary partition on the disk (partition type = 8e)
fdisk /dev/sdx # Replace "sdx" with your block device real name
n # create new partition
p # New primary partition
1 # select Partition number (1-4) <Enter>
# partition size: Accept the default values in case you want to use the full disk available space
t # set partition type LVM linux is 8e
1 # select partition
8e # for linux lvm
w # to write
- Create a new physical volume related to the partition created above
# Physical volume creation (Replace sdx with your block device name)
pvcreate /dev/sdx1
- Create a new volume group and include the pv mentioned above to it
vgcreate testdata_vg /dev/sdx1
- Create a new logical volume as child of the volume group above, you can specify a constant size or use 100% of the volumes currently part of the volume group above
Sample 1: New logical volume with size 20 GB
lvcreate -L 20000 -n vol01 testdata_vg

Sample 2: New logical volume using 100% of available space
lvcreate -l 100%FREE -n vol01 testdata_vg
- Format the logical volume created above
Sample: Format as ext4
mkfs.ext4 /dev/testdata_vg/vol01
You can now mount the volume (device name: /dev/testdta_vg/vol01).
Extending an exiting logical volume
Adding an extra disk
- Make sure the new disk is listed as block device (lsblk)
- Create a new partition on the new disk and set the type to 8e (see instructions above)
- Create a new physical volume
pvcreate /dev/sdx1
- Extend the volume group adding the new pv to the volume group
vgextend /dev/testdata_vg /dev/sdx1
- Extend the logical volume so that is can use all space available now on the volume group
lvextend -l +100%FREE /dev/testdata_vg/vol01
- Double check that the new volume is now part of the existing volume group (lsblk)
- Unmount the volume group
umount /your_volume_group_mount_point
- Check the file system integrity (ext filesystems only)
e2fsck -f /dev/testdata_vg/vol01
- Extend the file system (command for ext file systems)
resize2fs /dev/testdata_vg/vol01
- Extend the file system (command for xfs file systems)
Make sure that volume group is mounted before to issue the command below
xfs_grows /dev/testdata_vg/vol01
- Mount the drive (if not already mounted . . .)
mount /your_volume_group_mount_point
- Double check that now the volume group is using all new available disk space
df -h
Adding extra space added to an already existing disk
- Check the current partitions on extended physical disk
fdisk -l /dev/sdx
- Create a new primary partition and set type to 8e (see instructions above)
- Create a new physical volume
- Extend the volume group adding the new physical volume to the volume group
vgextend /dev/testdata_vg /dev/sdx1
- Extend the logical volume so that is can use all available size of the volume group
lvextend -l +100%FREE /dev/testdata_vg/vol01
- Check the integrity (ext file systems only)
e2fsck -f /dev/testdata_vg/vol01
- Extend the file system (command for ext file systems)
resize2fs /dev/testdata_vg/vol01
- Extend the file system (command for xfs file systems)
Make sure that volume group is mounted before to issue the command below
xfs_grows /dev/testdata_vg/vol01
- Mount the drive (if not already mounted . . .)
mount /your_volume_group_mount_point
- Double check that now the volume group is using all new available disk space
df -h
Troubleshooting
mkfs command takes a very long time
To run mkfs without trim, use the -K option on XFS and -E nodiscard on ext4.
XFS:
mkfs.xfs -K /dev/sdx
EXT4:
mkfs.ext4 -E nodiscard /dev/sdx
lsblk/df does not show volume changes
Reload the partition table with the command ‘partprobe’
A new disk has been attached to the VM, but it’s not listed as block device
Option #1: Reboot the VM
Option #2: Force the OS to scan list of attached block devices:
for host in /sys/class/scsi_host/*; do echo "- - -" | sudo tee $host/scan; ls /dev/sd* ; done